함수형 API
- 원본 링크 : https://keras.io/guides/functional_api/
- 최종 확인 : 2024-11-18
저자 : fchollet
생성일 : 2019/03/01
최종 편집일 : 2023/06/25
설명 : 함수형 API에 대한 완벽 가이드.
셋업
import numpy as np
import keras
from keras import layers
from keras import ops
소개
Keras 함수형 API 는 keras.Sequential API보다 더 유연한 모델을 만드는 방법입니다.
함수형 API는 비선형 토폴로지, 공유 레이어, 심지어 여러 입력이나 출력이 있는 모델을 다룰 수 있습니다.
주요 아이디어는 딥러닝 모델이 일반적으로 레이어의 방향성이 있는 비순환 그래프(DAG, directed acyclic graph)라는 것입니다. 따라서 함수형 API는 레이어 그래프 를 빌드하는 방법입니다.
함수형 API 모델
다음 모델을 생각해봅시다.
flowchart TD
    N1["input
    784-dimensional vectors"] --> N2["Dense
    (64 units, relu activation)"]
    N2 --> N3["Dense
    (64 units, relu activation)"]
    N3 --> N4["Dense
    (10 units, softmax activation)"]
    N4 --> N5["output
    logits of a probability distribution over 10 classes"]

    style N2 fill:#FFD600
    style N3 fill:#FFD600
    style N4 fill:#FFD600
이것은 3개의 레이어(노란색 Dense 레이어)가 있는 기본 그래프입니다.
함수형 API를 사용하여 이 모델을 빌드하려면, 먼저 입력 노드를 만듭니다.
inputs = keras.Input(shape=(784,))데이터 모양은 784차원 벡터로 설정됩니다. 각 샘플의 모양만 지정되므로, 배치 크기는 항상 생략됩니다.
예를 들어, (32, 32, 3) 모양의 이미지 입력이 있는 경우, 다음을 사용합니다.
# 단지 데모 목적입니다.
img_inputs = keras.Input(shape=(32, 32, 3))
반환된 inputs에는 모델에 공급하는 입력 데이터의 모양과 dtype에 대한 정보가 들어 있습니다.
모양은 다음과 같습니다.
inputs.shape결과
(None, 784)dtype은 다음과 같습니다.
inputs.dtype결과
'float32'이 inputs 객체에서 레이어를 호출하여, 레이어 그래프에 새 노드를 만듭니다.
dense = layers.Dense(64, activation="relu")
x = dense(inputs)
“레이어 호출” 작업은 “inputs"에서 생성한 이 레이어로 화살표를 그리는 것과 같습니다.
입력을 dense 레이어로 “전달"하고, 출력으로 x를 얻습니다.
레이어 그래프에 몇 개의 레이어를 더 추가해 보겠습니다.
x = layers.Dense(64, activation="relu")(x)
outputs = layers.Dense(10)(x)
이 시점에서, 그래프 레이어에 입력과 출력을 지정하여 Model을 생성할 수 있습니다.
model = keras.Model(inputs=inputs, outputs=outputs, name="mnist_model")모델 요약 & 플롯
모델 요약이 어떤지 살펴보겠습니다.
import keras
from keras import layers

inputs = keras.Input(shape=(784,))
dense = layers.Dense(64, activation="relu")
x = dense(inputs)
x = layers.Dense(64, activation="relu")(x)
outputs = layers.Dense(10)(x)

model = keras.Model(inputs=inputs, outputs=outputs, name="mnist_model")model.summary()결과
Model: "mnist_model"
┏━━━━━━━━━━━━━━━━━━━━━━━━━━━━━━━━━━━━━━┳━━━━━━━━━━━━━━━━━━━━━━━━━━━━━┳━━━━━━━━━━━━━━━━━┓
┃ Layer (type)                         ┃ Output Shape                ┃         Param # ┃
┡━━━━━━━━━━━━━━━━━━━━━━━━━━━━━━━━━━━━━━╇━━━━━━━━━━━━━━━━━━━━━━━━━━━━━╇━━━━━━━━━━━━━━━━━┩
│ input_layer_5 (InputLayer)           │ (None, 784)                 │               0 │
├──────────────────────────────────────┼─────────────────────────────┼─────────────────┤
│ dense_10 (Dense)                     │ (None, 64)                  │          50,240 │
├──────────────────────────────────────┼─────────────────────────────┼─────────────────┤
│ dense_11 (Dense)                     │ (None, 64)                  │           4,160 │
├──────────────────────────────────────┼─────────────────────────────┼─────────────────┤
│ dense_12 (Dense)                     │ (None, 10)                  │             650 │
└──────────────────────────────────────┴─────────────────────────────┴─────────────────┘
 Total params: 55,050 (215.04 KB)
 Trainable params: 55,050 (215.04 KB)
 Non-trainable params: 0 (0.00 B)
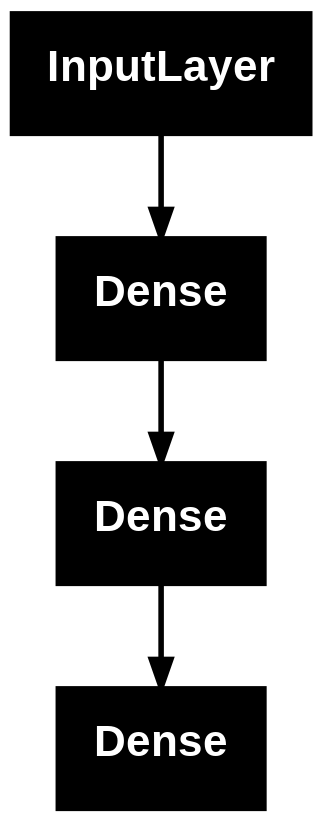
모델을 그래프로 표시할 수도 있습니다.
keras.utils.plot_model(model, "my_first_model.png")
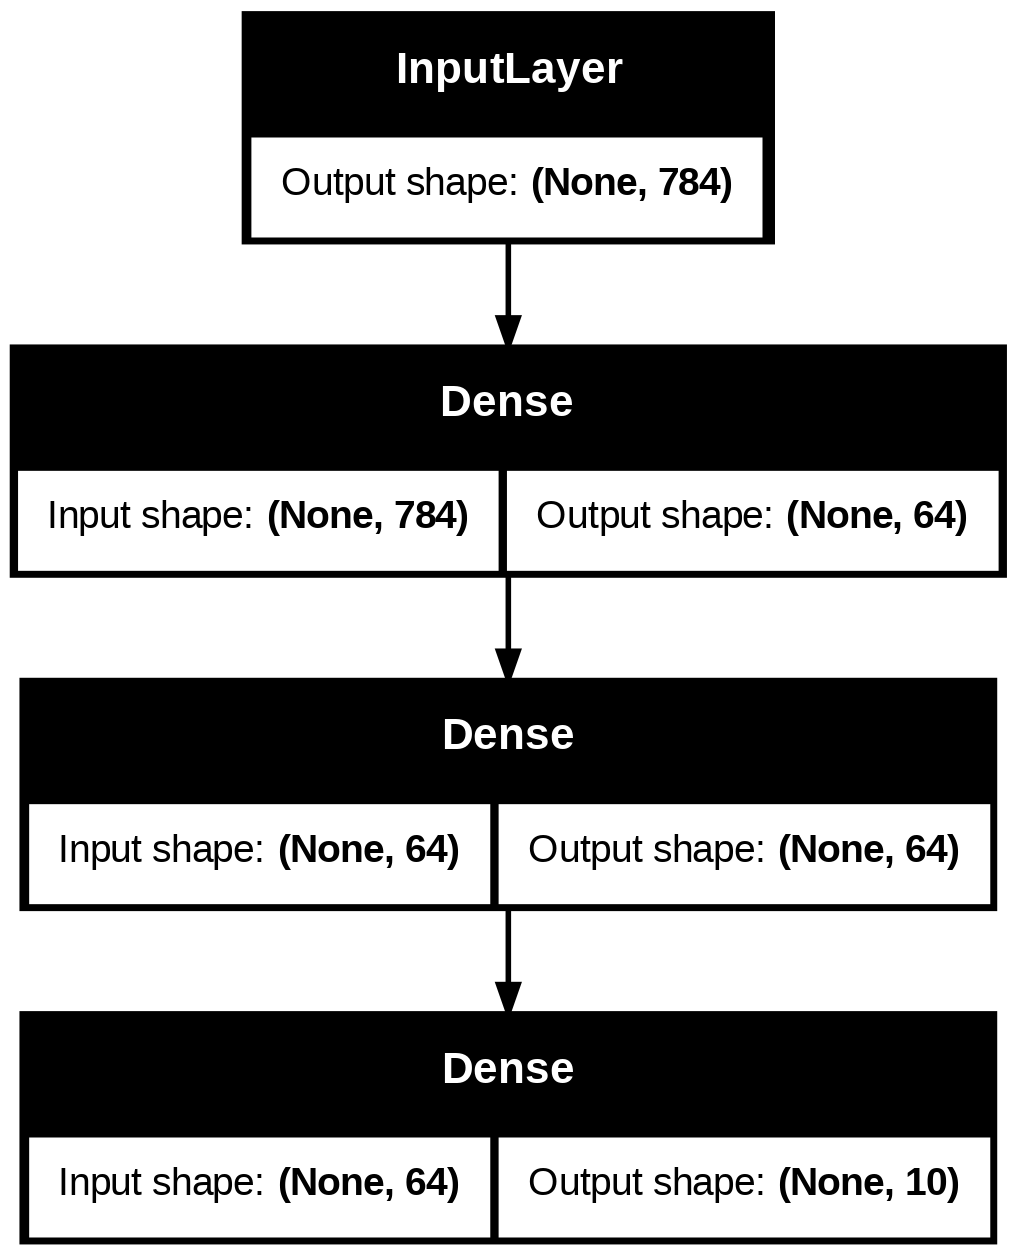
그리고, 선택적으로, 플롯된 그래프에 각 레이어의 입력 및 출력 모양을 표시합니다.
keras.utils.plot_model(model, "my_first_model_with_shape_info.png", show_shapes=True)
이 그림과 코드는 거의 동일합니다. 코드 버전에서는, 연결 화살표가 호출 연산으로 대체되었습니다.
“레이어 그래프"는 딥러닝 모델에 대한 직관적인 정신적 이미지이며, 함수형 API는 이를 밀접하게 반영하는 모델을 만드는 방법입니다.
트레이닝, 평가 및 추론
트레이닝, 평가 및 추론은 함수형 API를 사용하여 빌드된 모델에서,
Sequential 모델과 정확히 동일한 방식으로 작동합니다.
Model 클래스는 빌트인 트레이닝 루프(fit() 메서드)와 빌트인 평가 루프(evaluate() 메서드)를 제공합니다.
이러한 루프를 쉽게 커스터마이즈하여, 당신만의 트레이닝 루틴을 구현할 수 있습니다.
fit()에서 발생하는 작업을 커스터마이즈하는 방법에 대한 가이드도 참조하세요.
여기서, MNIST 이미지 데이터를 로드하고, 벡터로 reshape하고, (검증 분할에서 성능을 모니터링하면서) 데이터에 대해 fit한 다음, 테스트 데이터에 대해 모델을 평가합니다.
(x_train, y_train), (x_test, y_test) = keras.datasets.mnist.load_data()

x_train = x_train.reshape(60000, 784).astype("float32") / 255
x_test = x_test.reshape(10000, 784).astype("float32") / 255

model.compile(
    loss=keras.losses.SparseCategoricalCrossentropy(from_logits=True),
    optimizer=keras.optimizers.RMSprop(),
    metrics=["accuracy"],
)

history = model.fit(x_train, y_train, batch_size=64, epochs=2, validation_split=0.2)

test_scores = model.evaluate(x_test, y_test, verbose=2)
print("Test loss:", test_scores[0])
print("Test accuracy:", test_scores[1])
결과
Epoch 1/2
 750/750 ━━━━━━━━━━━━━━━━━━━━ 1s 863us/step - accuracy: 0.8425 - loss: 0.5733 - val_accuracy: 0.9496 - val_loss: 0.1711
Epoch 2/2
 750/750 ━━━━━━━━━━━━━━━━━━━━ 1s 859us/step - accuracy: 0.9509 - loss: 0.1641 - val_accuracy: 0.9578 - val_loss: 0.1396
313/313 - 0s - 341us/step - accuracy: 0.9613 - loss: 0.1288
Test loss: 0.12876172363758087
Test accuracy: 0.9613000154495239
자세한 내용은 트레이닝 및 평가 가이드를 참조하세요.
저장 및 직렬화
모델 저장 및 직렬화는 Sequential 모델과 마찬가지로,
함수형 API를 사용하여 빌드한 모델에 대해서도 동일한 방식으로 작동합니다.
함수형 모델을 저장하는 표준 방법은 model.save()를 호출하여,
전체 모델을 단일 파일로 저장하는 것입니다.
심지어 나중에 모델을 빌드한 코드를 더 이상 사용할 수 없더라도,
이 파일에서 동일한 모델을 다시 만들 수 있습니다.
이 저장된 파일에는 다음이 포함됩니다.
- 모델 아키텍처
- 모델 가중치 값(트레이닝 중에 학습한 값)
- 모델 트레이닝 구성(있는 경우,
compile()에 전달됨) - 옵티마이저 및 해당 상태(있는 경우, 중단한 지점에서 트레이닝을 다시 시작하기 위함)
model.save("my_model.keras")
del model
# 파일에서 정확히 동일한 모델을 재생성합니다.
model = keras.models.load_model("my_model.keras")
자세한 내용은 모델 직렬화 및 저장 가이드를 읽어보세요.
동일한 레이어 그래프를 사용하여 여러 모델 정의
함수형 API에서, 모델은 레이어 그래프에서 입력과 출력을 지정하여 생성됩니다. 즉, 레이어의 단일 그래프를 사용하여 여러 모델을 생성할 수 있습니다.
아래 예에서, 동일한 레이어 스택을 사용하여 두 모델을 인스턴스화합니다.
- (1) 이미지 입력을 16차원 벡터로 변환하는
encoder모델과 - (2) 트레이닝을 위한 엔드투엔드
autoencoder모델입니다.
encoder_input = keras.Input(shape=(28, 28, 1), name="img")
x = layers.Conv2D(16, 3, activation="relu")(encoder_input)
x = layers.Conv2D(32, 3, activation="relu")(x)
x = layers.MaxPooling2D(3)(x)
x = layers.Conv2D(32, 3, activation="relu")(x)
x = layers.Conv2D(16, 3, activation="relu")(x)
encoder_output = layers.GlobalMaxPooling2D()(x)

encoder = keras.Model(encoder_input, encoder_output, name="encoder")
encoder.summary()

x = layers.Reshape((4, 4, 1))(encoder_output)
x = layers.Conv2DTranspose(16, 3, activation="relu")(x)
x = layers.Conv2DTranspose(32, 3, activation="relu")(x)
x = layers.UpSampling2D(3)(x)
x = layers.Conv2DTranspose(16, 3, activation="relu")(x)
decoder_output = layers.Conv2DTranspose(1, 3, activation="relu")(x)

autoencoder = keras.Model(encoder_input, decoder_output, name="autoencoder")
autoencoder.summary()
결과
Model: "encoder"
┏━━━━━━━━━━━━━━━━━━━━━━━━━━━━━━━━━┳━━━━━━━━━━━━━━━━━━━━━━━━┳━━━━━━━━━━━━━━━┓
┃ Layer (type)                    ┃ Output Shape           ┃       Param # ┃
┡━━━━━━━━━━━━━━━━━━━━━━━━━━━━━━━━━╇━━━━━━━━━━━━━━━━━━━━━━━━╇━━━━━━━━━━━━━━━┩
│ img (InputLayer)                │ (None, 28, 28, 1)      │             0 │
├─────────────────────────────────┼────────────────────────┼───────────────┤
│ conv2d (Conv2D)                 │ (None, 26, 26, 16)     │           160 │
├─────────────────────────────────┼────────────────────────┼───────────────┤
│ conv2d_1 (Conv2D)               │ (None, 24, 24, 32)     │         4,640 │
├─────────────────────────────────┼────────────────────────┼───────────────┤
│ max_pooling2d (MaxPooling2D)    │ (None, 8, 8, 32)       │             0 │
├─────────────────────────────────┼────────────────────────┼───────────────┤
│ conv2d_2 (Conv2D)               │ (None, 6, 6, 32)       │         9,248 │
├─────────────────────────────────┼────────────────────────┼───────────────┤
│ conv2d_3 (Conv2D)               │ (None, 4, 4, 16)       │         4,624 │
├─────────────────────────────────┼────────────────────────┼───────────────┤
│ global_max_pooling2d            │ (None, 16)             │             0 │
│ (GlobalMaxPooling2D)            │                        │               │
└─────────────────────────────────┴────────────────────────┴───────────────┘
 Total params: 18,672 (72.94 KB)
 Trainable params: 18,672 (72.94 KB)
 Non-trainable params: 0 (0.00 B)
Model: "autoencoder"
┏━━━━━━━━━━━━━━━━━━━━━━━━━━━━━━━━━┳━━━━━━━━━━━━━━━━━━━━━━━━┳━━━━━━━━━━━━━━━┓
┃ Layer (type)                    ┃ Output Shape           ┃       Param # ┃
┡━━━━━━━━━━━━━━━━━━━━━━━━━━━━━━━━━╇━━━━━━━━━━━━━━━━━━━━━━━━╇━━━━━━━━━━━━━━━┩
│ img (InputLayer)                │ (None, 28, 28, 1)      │             0 │
├─────────────────────────────────┼────────────────────────┼───────────────┤
│ conv2d (Conv2D)                 │ (None, 26, 26, 16)     │           160 │
├─────────────────────────────────┼────────────────────────┼───────────────┤
│ conv2d_1 (Conv2D)               │ (None, 24, 24, 32)     │         4,640 │
├─────────────────────────────────┼────────────────────────┼───────────────┤
│ max_pooling2d (MaxPooling2D)    │ (None, 8, 8, 32)       │             0 │
├─────────────────────────────────┼────────────────────────┼───────────────┤
│ conv2d_2 (Conv2D)               │ (None, 6, 6, 32)       │         9,248 │
├─────────────────────────────────┼────────────────────────┼───────────────┤
│ conv2d_3 (Conv2D)               │ (None, 4, 4, 16)       │         4,624 │
├─────────────────────────────────┼────────────────────────┼───────────────┤
│ global_max_pooling2d            │ (None, 16)             │             0 │
│ (GlobalMaxPooling2D)            │                        │               │
├─────────────────────────────────┼────────────────────────┼───────────────┤
│ reshape (Reshape)               │ (None, 4, 4, 1)        │             0 │
├─────────────────────────────────┼────────────────────────┼───────────────┤
│ conv2d_transpose                │ (None, 6, 6, 16)       │           160 │
│ (Conv2DTranspose)               │                        │               │
├─────────────────────────────────┼────────────────────────┼───────────────┤
│ conv2d_transpose_1              │ (None, 8, 8, 32)       │         4,640 │
│ (Conv2DTranspose)               │                        │               │
├─────────────────────────────────┼────────────────────────┼───────────────┤
│ up_sampling2d (UpSampling2D)    │ (None, 24, 24, 32)     │             0 │
├─────────────────────────────────┼────────────────────────┼───────────────┤
│ conv2d_transpose_2              │ (None, 26, 26, 16)     │         4,624 │
│ (Conv2DTranspose)               │                        │               │
├─────────────────────────────────┼────────────────────────┼───────────────┤
│ conv2d_transpose_3              │ (None, 28, 28, 1)      │           145 │
│ (Conv2DTranspose)               │                        │               │
└─────────────────────────────────┴────────────────────────┴───────────────┘
 Total params: 28,241 (110.32 KB)
 Trainable params: 28,241 (110.32 KB)
 Non-trainable params: 0 (0.00 B)
여기서, 디코딩 아키텍처는 인코딩 아키텍처와 엄격히 대칭적이므로,
출력 모양은 입력 모양 (28, 28, 1)과 동일합니다.
Conv2D 레이어의 역은 Conv2DTranspose 레이어이고,
MaxPooling2D 레이어의 역은 UpSampling2D 레이어입니다.
모든 모델은 (레이어와 마찬가지로) 호출 가능합니다.
Input 또는 다른 레이어의 출력에서 호출하여, 모든 모델을 레이어인 것처럼 취급할 수 있습니다.
모델을 호출하면 모델의 아키텍처를 재사용하는 것뿐만 아니라, 가중치도 재사용하는 것입니다.
이를 실제로 보려면, 인코더 모델, 디코더 모델을 만들고, 두 호출로 체인하여, 오토인코더 모델을 얻는 오토인코더 예제에 대한 다른 방법이 있습니다.
encoder_input = keras.Input(shape=(28, 28, 1), name="original_img")
x = layers.Conv2D(16, 3, activation="relu")(encoder_input)
x = layers.Conv2D(32, 3, activation="relu")(x)
x = layers.MaxPooling2D(3)(x)
x = layers.Conv2D(32, 3, activation="relu")(x)
x = layers.Conv2D(16, 3, activation="relu")(x)
encoder_output = layers.GlobalMaxPooling2D()(x)

encoder = keras.Model(encoder_input, encoder_output, name="encoder")
encoder.summary()

decoder_input = keras.Input(shape=(16,), name="encoded_img")
x = layers.Reshape((4, 4, 1))(decoder_input)
x = layers.Conv2DTranspose(16, 3, activation="relu")(x)
x = layers.Conv2DTranspose(32, 3, activation="relu")(x)
x = layers.UpSampling2D(3)(x)
x = layers.Conv2DTranspose(16, 3, activation="relu")(x)
decoder_output = layers.Conv2DTranspose(1, 3, activation="relu")(x)

decoder = keras.Model(decoder_input, decoder_output, name="decoder")
decoder.summary()

autoencoder_input = keras.Input(shape=(28, 28, 1), name="img")
encoded_img = encoder(autoencoder_input)
decoded_img = decoder(encoded_img)
autoencoder = keras.Model(autoencoder_input, decoded_img, name="autoencoder")
autoencoder.summary()
결과
Model: "encoder"
┏━━━━━━━━━━━━━━━━━━━━━━━━━━━━━━━━━┳━━━━━━━━━━━━━━━━━━━━━━━━┳━━━━━━━━━━━━━━━┓
┃ Layer (type)                    ┃ Output Shape           ┃       Param # ┃
┡━━━━━━━━━━━━━━━━━━━━━━━━━━━━━━━━━╇━━━━━━━━━━━━━━━━━━━━━━━━╇━━━━━━━━━━━━━━━┩
│ original_img (InputLayer)       │ (None, 28, 28, 1)      │             0 │
├─────────────────────────────────┼────────────────────────┼───────────────┤
│ conv2d_4 (Conv2D)               │ (None, 26, 26, 16)     │           160 │
├─────────────────────────────────┼────────────────────────┼───────────────┤
│ conv2d_5 (Conv2D)               │ (None, 24, 24, 32)     │         4,640 │
├─────────────────────────────────┼────────────────────────┼───────────────┤
│ max_pooling2d_1 (MaxPooling2D)  │ (None, 8, 8, 32)       │             0 │
├─────────────────────────────────┼────────────────────────┼───────────────┤
│ conv2d_6 (Conv2D)               │ (None, 6, 6, 32)       │         9,248 │
├─────────────────────────────────┼────────────────────────┼───────────────┤
│ conv2d_7 (Conv2D)               │ (None, 4, 4, 16)       │         4,624 │
├─────────────────────────────────┼────────────────────────┼───────────────┤
│ global_max_pooling2d_1          │ (None, 16)             │             0 │
│ (GlobalMaxPooling2D)            │                        │               │
└─────────────────────────────────┴────────────────────────┴───────────────┘
 Total params: 18,672 (72.94 KB)
 Trainable params: 18,672 (72.94 KB)
 Non-trainable params: 0 (0.00 B)
Model: "decoder"
┏━━━━━━━━━━━━━━━━━━━━━━━━━━━━━━━━━┳━━━━━━━━━━━━━━━━━━━━━━━━┳━━━━━━━━━━━━━━━┓
┃ Layer (type)                    ┃ Output Shape           ┃       Param # ┃
┡━━━━━━━━━━━━━━━━━━━━━━━━━━━━━━━━━╇━━━━━━━━━━━━━━━━━━━━━━━━╇━━━━━━━━━━━━━━━┩
│ encoded_img (InputLayer)        │ (None, 16)             │             0 │
├─────────────────────────────────┼────────────────────────┼───────────────┤
│ reshape_1 (Reshape)             │ (None, 4, 4, 1)        │             0 │
├─────────────────────────────────┼────────────────────────┼───────────────┤
│ conv2d_transpose_4              │ (None, 6, 6, 16)       │           160 │
│ (Conv2DTranspose)               │                        │               │
├─────────────────────────────────┼────────────────────────┼───────────────┤
│ conv2d_transpose_5              │ (None, 8, 8, 32)       │         4,640 │
│ (Conv2DTranspose)               │                        │               │
├─────────────────────────────────┼────────────────────────┼───────────────┤
│ up_sampling2d_1 (UpSampling2D)  │ (None, 24, 24, 32)     │             0 │
├─────────────────────────────────┼────────────────────────┼───────────────┤
│ conv2d_transpose_6              │ (None, 26, 26, 16)     │         4,624 │
│ (Conv2DTranspose)               │                        │               │
├─────────────────────────────────┼────────────────────────┼───────────────┤
│ conv2d_transpose_7              │ (None, 28, 28, 1)      │           145 │
│ (Conv2DTranspose)               │                        │               │
└─────────────────────────────────┴────────────────────────┴───────────────┘
 Total params: 9,569 (37.38 KB)
 Trainable params: 9,569 (37.38 KB)
 Non-trainable params: 0 (0.00 B)
Model: "autoencoder"
┏━━━━━━━━━━━━━━━━━━━━━━━━━━━━━━━━━┳━━━━━━━━━━━━━━━━━━━━━━━━┳━━━━━━━━━━━━━━━┓
┃ Layer (type)                    ┃ Output Shape           ┃       Param # ┃
┡━━━━━━━━━━━━━━━━━━━━━━━━━━━━━━━━━╇━━━━━━━━━━━━━━━━━━━━━━━━╇━━━━━━━━━━━━━━━┩
│ img (InputLayer)                │ (None, 28, 28, 1)      │             0 │
├─────────────────────────────────┼────────────────────────┼───────────────┤
│ encoder (Functional)            │ (None, 16)             │        18,672 │
├─────────────────────────────────┼────────────────────────┼───────────────┤
│ decoder (Functional)            │ (None, 28, 28, 1)      │         9,569 │
└─────────────────────────────────┴────────────────────────┴───────────────┘
 Total params: 28,241 (110.32 KB)
 Trainable params: 28,241 (110.32 KB)
 Non-trainable params: 0 (0.00 B)
보시다시피, 모델은 중첩될 수 있습니다. 모델은 하위 모델을 포함할 수 있습니다. (모델은 레이어와 같기 때문입니다) 모델 중첩의 일반적인 사용 사례는 앙상블 입니다. 예를 들어, 다음은 여러 모델을 예측의 평균을 내는 단일 모델로 앙상블하는 방법입니다.
def get_model():
    inputs = keras.Input(shape=(128,))
    outputs = layers.Dense(1)(inputs)
    return keras.Model(inputs, outputs)


model1 = get_model()
model2 = get_model()
model3 = get_model()

inputs = keras.Input(shape=(128,))
y1 = model1(inputs)
y2 = model2(inputs)
y3 = model3(inputs)
outputs = layers.average([y1, y2, y3])
ensemble_model = keras.Model(inputs=inputs, outputs=outputs)
복잡한 그래프 토폴로지 조작
여러 입력 및 출력이 있는 모델
함수형 API를 사용하면, 여러 입력과 출력을 쉽게 조작할 수 있습니다.
이는 Sequential API로는 처리할 수 없습니다.
예를 들어, 우선순위에 따라 고객 문제 티켓을 순위를 매기고, 올바른 부서로 라우팅하는 시스템을 구축하는 경우, 모델에는 세 가지 입력이 있습니다.
- 티켓 제목 (텍스트 입력),
- 티켓 텍스트 본문 (텍스트 입력),
- 사용자가 추가한 어떤 태그들 (카테고리형 입력)
이 모델에는 두 가지 출력이 있습니다.
- 0~1 사이의 우선순위 점수(스칼라 sigmoid 출력),
- 티켓을 처리해야 하는 부서(부서 집합에 대한 softmax 출력).
함수형 API를 사용하면 몇 줄로 이 모델을 빌드할 수 있습니다.
num_tags = 12  # 고유한 이슈 태그 수
num_words = 10000  # 텍스트 데이터를 전처리할 때, 얻은 어휘의 크기
num_departments = 4  # 예측을 위한 부서 수

title_input = keras.Input(
    shape=(None,), name="title"
)  # 가변 길이의 int 시퀀스
body_input = keras.Input(shape=(None,), name="body")  # 가변 길이의 int 시퀀스
tags_input = keras.Input(
    shape=(num_tags,), name="tags"
)  # 크기가 `num_tags`인 이진 벡터

# 제목의 각 단어를 64차원 벡터에 임베드합니다.
title_features = layers.Embedding(num_words, 64)(title_input)
# 텍스트의 각 단어를 64차원 벡터에 임베드합니다.
body_features = layers.Embedding(num_words, 64)(body_input)

# 제목에 임베드된 단어의 시퀀스를, 단일 128차원 벡터로 줄입니다.
title_features = layers.LSTM(128)(title_features)
# 본문에 포함된 단어의 시퀀스를, 단일 32차원 벡터로 줄입니다.
body_features = layers.LSTM(32)(body_features)

# 연결(concatenation)을 통해, 사용 가능한 모든 특성들을 하나의 큰 벡터로 병합합니다.
x = layers.concatenate([title_features, body_features, tags_input])

# 우선 순위 예측을 위해, 특성 위에 로지스틱 회귀를 붙입니다.
priority_pred = layers.Dense(1, name="priority")(x)
# 특성 위에 부서 분류기를 붙입니다.
department_pred = layers.Dense(num_departments, name="department")(x)

# 우선 순위와 부서를 모두 예측하는, 종단 간 모델 인스턴스화
model = keras.Model(
    inputs=[title_input, body_input, tags_input],
    outputs={"priority": priority_pred, "department": department_pred},
)
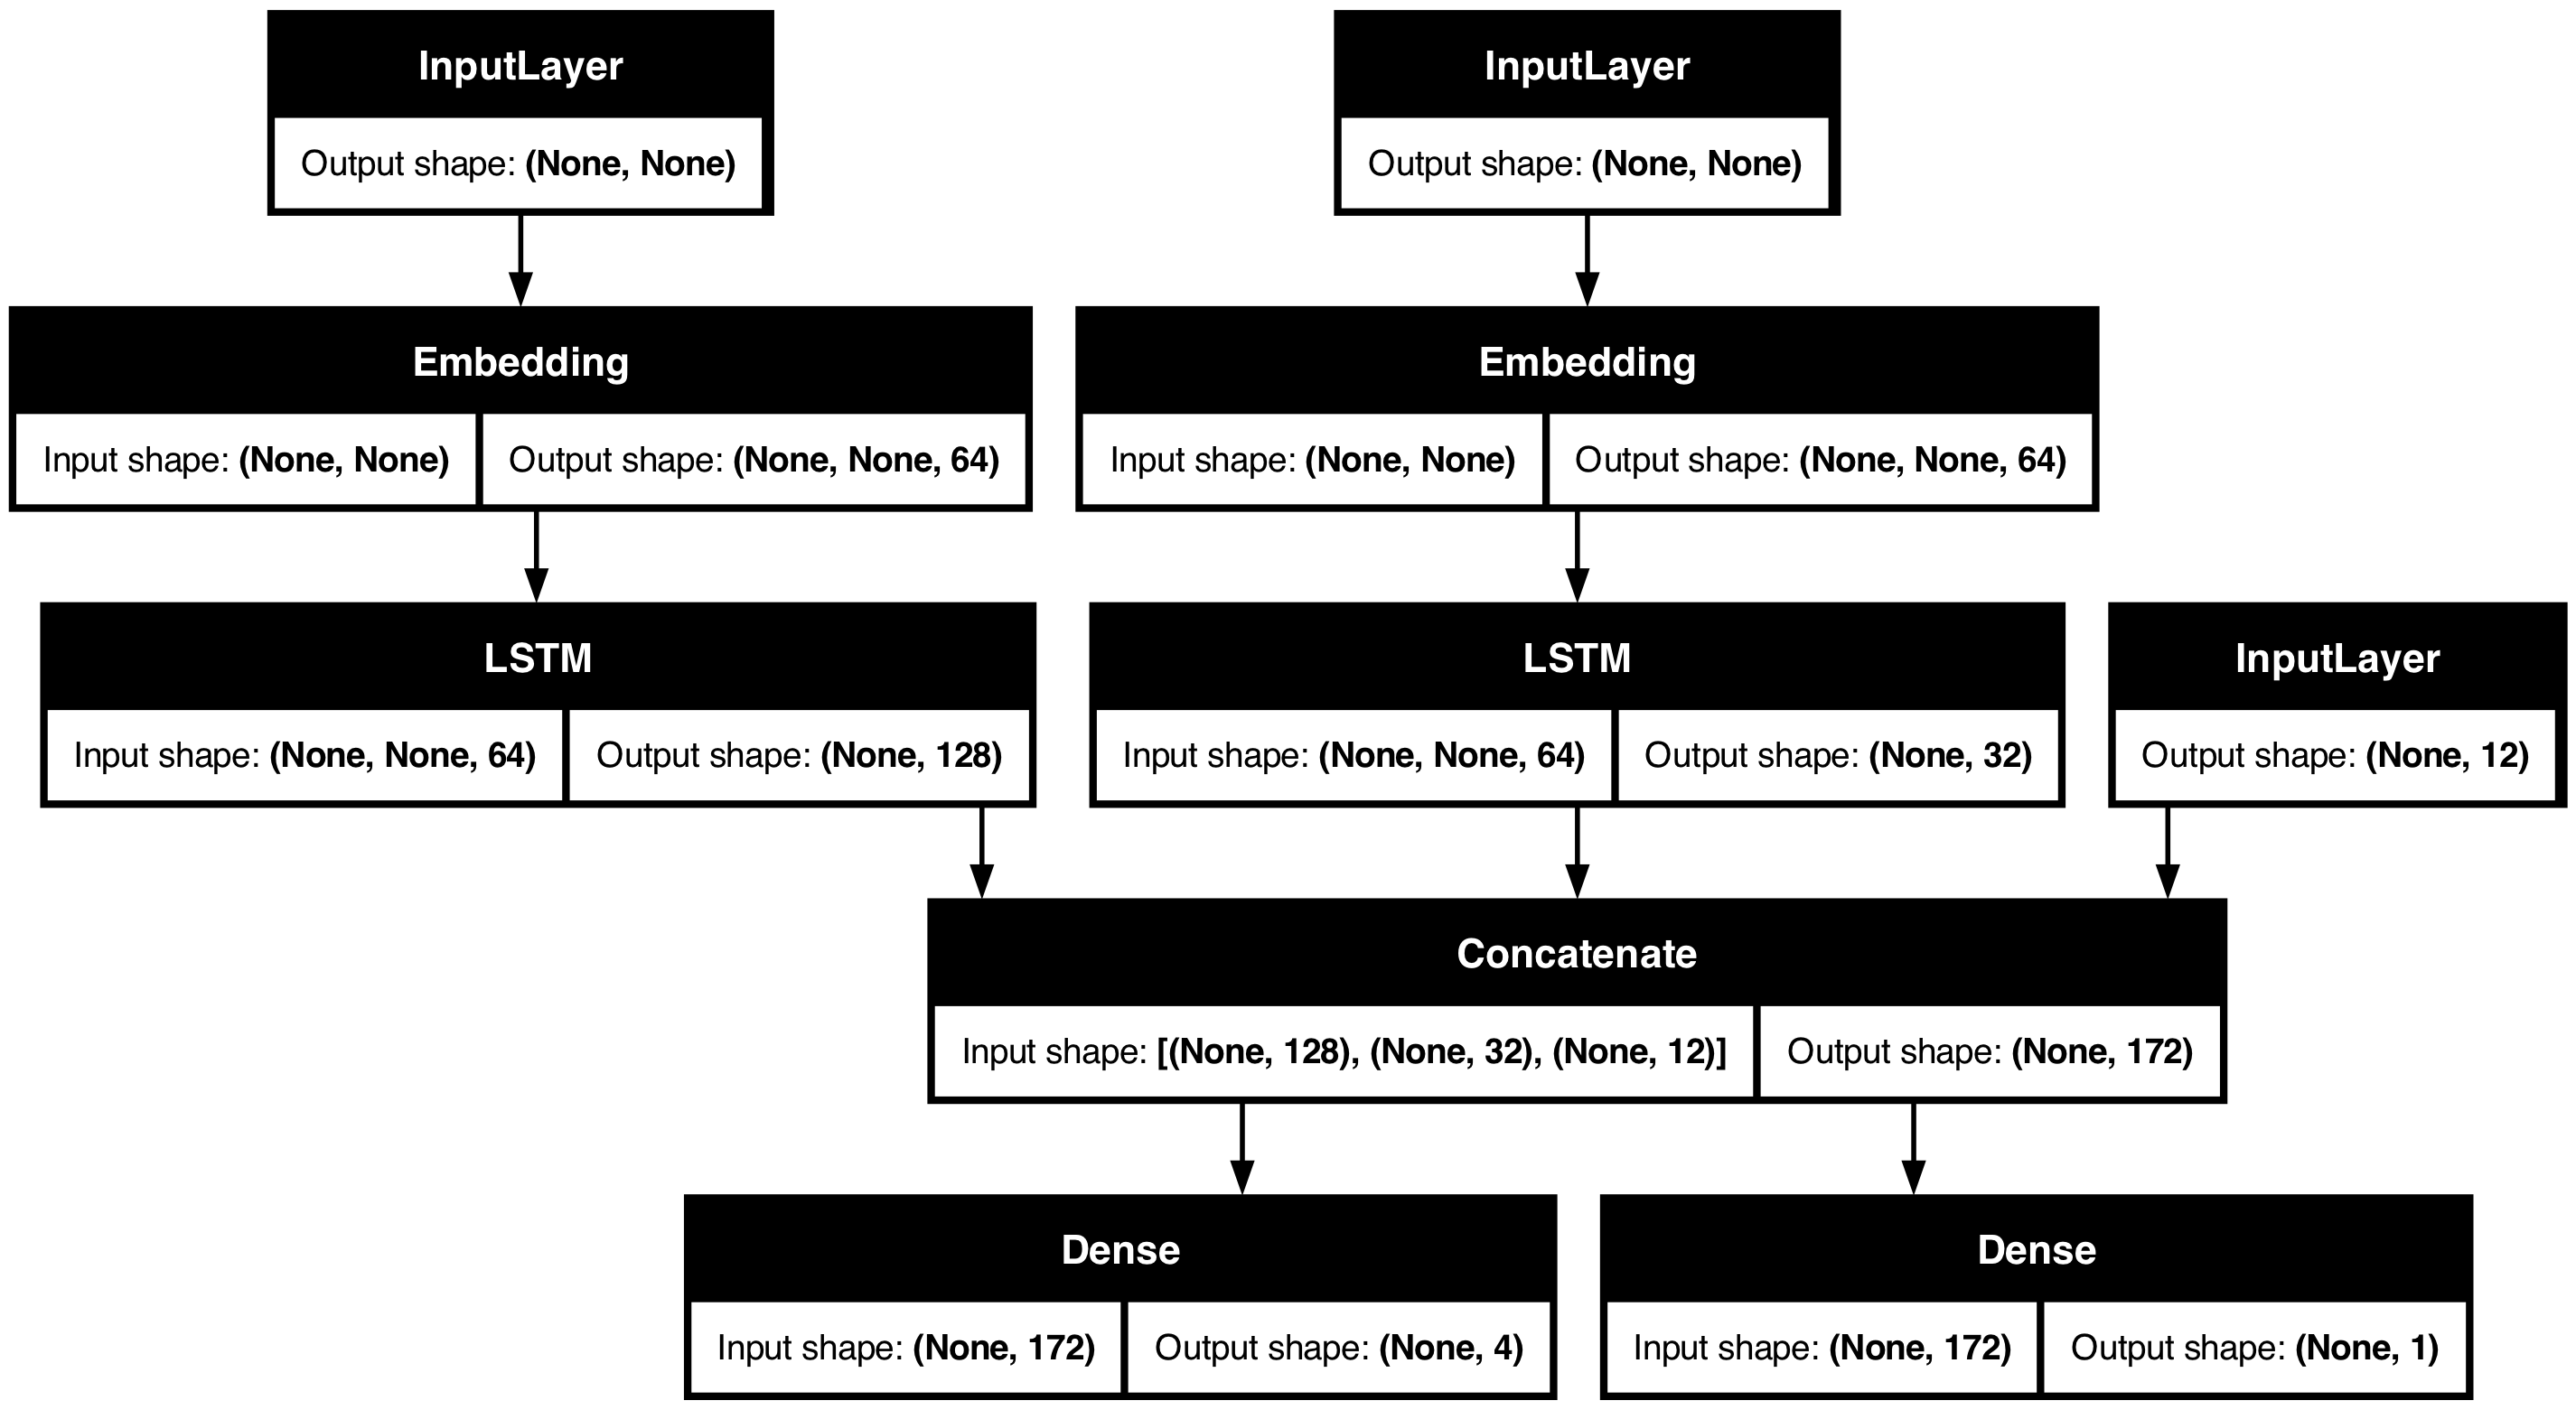
이제 모델을 플롯합니다.
keras.utils.plot_model(model, "multi_input_and_output_model.png", show_shapes=True)
이 모델을 컴파일할 때, 각 출력에 다른 손실을 할당할 수 있습니다. 각 손실에 다른 가중치를 할당하여, 총 트레이닝 손실에 대한 기여도를 조절할 수도 있습니다.
model.compile(
    optimizer=keras.optimizers.RMSprop(1e-3),
    loss=[
        keras.losses.BinaryCrossentropy(from_logits=True),
        keras.losses.CategoricalCrossentropy(from_logits=True),
    ],
    loss_weights=[1.0, 0.2],
)
출력 레이어의 이름이 다르므로, 해당 레이어 이름으로 손실 및 손실 가중치를 지정할 수도 있습니다.
model.compile(
    optimizer=keras.optimizers.RMSprop(1e-3),
    loss={
        "priority": keras.losses.BinaryCrossentropy(from_logits=True),
        "department": keras.losses.CategoricalCrossentropy(from_logits=True),
    },
    loss_weights={"priority": 1.0, "department": 0.2},
)
입력 및 대상의 NumPy 배열 리스트를 전달하여 모델을 트레이닝합니다.
# 더미 입력 데이터
title_data = np.random.randint(num_words, size=(1280, 12))
body_data = np.random.randint(num_words, size=(1280, 100))
tags_data = np.random.randint(2, size=(1280, num_tags)).astype("float32")

# 더미 타겟 데이터
priority_targets = np.random.random(size=(1280, 1))
dept_targets = np.random.randint(2, size=(1280, num_departments))

model.fit(
    {"title": title_data, "body": body_data, "tags": tags_data},
    {"priority": priority_targets, "department": dept_targets},
    epochs=2,
    batch_size=32,
)
결과
Epoch 1/2
 40/40 ━━━━━━━━━━━━━━━━━━━━ 3s 57ms/step - loss: 1108.3792
Epoch 2/2
 40/40 ━━━━━━━━━━━━━━━━━━━━ 2s 54ms/step - loss: 621.3049

<keras.src.callbacks.history.History at 0x34afc3d90>
Dataset 객체로 fit을 호출할 때,
([title_data, body_data, tags_data], [priority_targets, dept_targets])와 같은 리스트 튜플이나,
({'title': title_data, 'body': body_data, 'tags': tags_data}, {'priority': priority_targets, 'department': dept_targets})와 같은 딕셔너리 튜플을 생성해야 합니다.
자세한 설명은 트레이닝 및 평가 가이드를 참조하세요.
토이 ResNet 모델
여러 입력과 출력이 있는 모델 외에도, 함수형 API는 비선형 연결 토폴로지를 쉽게 조작할 수 있게 해줍니다.
이는 순차적으로 연결되지 않은 레이어가 있는 모델로, Sequential API에서는 처리할 수 없습니다.
이에 대한 일반적인 사용 사례는 residual 연결입니다. 이를 보여주기 위해, CIFAR10에 대한 토이 ResNet 모델을 빌드해 보겠습니다.
inputs = keras.Input(shape=(32, 32, 3), name="img")
x = layers.Conv2D(32, 3, activation="relu")(inputs)
x = layers.Conv2D(64, 3, activation="relu")(x)
block_1_output = layers.MaxPooling2D(3)(x)

x = layers.Conv2D(64, 3, activation="relu", padding="same")(block_1_output)
x = layers.Conv2D(64, 3, activation="relu", padding="same")(x)
block_2_output = layers.add([x, block_1_output])

x = layers.Conv2D(64, 3, activation="relu", padding="same")(block_2_output)
x = layers.Conv2D(64, 3, activation="relu", padding="same")(x)
block_3_output = layers.add([x, block_2_output])

x = layers.Conv2D(64, 3, activation="relu")(block_3_output)
x = layers.GlobalAveragePooling2D()(x)
x = layers.Dense(256, activation="relu")(x)
x = layers.Dropout(0.5)(x)
outputs = layers.Dense(10)(x)

model = keras.Model(inputs, outputs, name="toy_resnet")
model.summary()
결과
Model: "toy_resnet"
┏━━━━━━━━━━━━━━━━━━━━━┳━━━━━━━━━━━━━━━━━━━┳━━━━━━━━━━━━┳━━━━━━━━━━━━━━━━━━━┓
┃ Layer (type)        ┃ Output Shape      ┃    Param # ┃ Connected to      ┃
┡━━━━━━━━━━━━━━━━━━━━━╇━━━━━━━━━━━━━━━━━━━╇━━━━━━━━━━━━╇━━━━━━━━━━━━━━━━━━━┩
│ img (InputLayer)    │ (None, 32, 32, 3) │          0 │ -                 │
├─────────────────────┼───────────────────┼────────────┼───────────────────┤
│ conv2d_8 (Conv2D)   │ (None, 30, 30,    │        896 │ img[0][0]         │
│                     │ 32)               │            │                   │
├─────────────────────┼───────────────────┼────────────┼───────────────────┤
│ conv2d_9 (Conv2D)   │ (None, 28, 28,    │     18,496 │ conv2d_8[0][0]    │
│                     │ 64)               │            │                   │
├─────────────────────┼───────────────────┼────────────┼───────────────────┤
│ max_pooling2d_2     │ (None, 9, 9, 64)  │          0 │ conv2d_9[0][0]    │
│ (MaxPooling2D)      │                   │            │                   │
├─────────────────────┼───────────────────┼────────────┼───────────────────┤
│ conv2d_10 (Conv2D)  │ (None, 9, 9, 64)  │     36,928 │ max_pooling2d_2[… │
├─────────────────────┼───────────────────┼────────────┼───────────────────┤
│ conv2d_11 (Conv2D)  │ (None, 9, 9, 64)  │     36,928 │ conv2d_10[0][0]   │
├─────────────────────┼───────────────────┼────────────┼───────────────────┤
│ add (Add)           │ (None, 9, 9, 64)  │          0 │ conv2d_11[0][0],  │
│                     │                   │            │ max_pooling2d_2[… │
├─────────────────────┼───────────────────┼────────────┼───────────────────┤
│ conv2d_12 (Conv2D)  │ (None, 9, 9, 64)  │     36,928 │ add[0][0]         │
├─────────────────────┼───────────────────┼────────────┼───────────────────┤
│ conv2d_13 (Conv2D)  │ (None, 9, 9, 64)  │     36,928 │ conv2d_12[0][0]   │
├─────────────────────┼───────────────────┼────────────┼───────────────────┤
│ add_1 (Add)         │ (None, 9, 9, 64)  │          0 │ conv2d_13[0][0],  │
│                     │                   │            │ add[0][0]         │
├─────────────────────┼───────────────────┼────────────┼───────────────────┤
│ conv2d_14 (Conv2D)  │ (None, 7, 7, 64)  │     36,928 │ add_1[0][0]       │
├─────────────────────┼───────────────────┼────────────┼───────────────────┤
│ global_average_poo… │ (None, 64)        │          0 │ conv2d_14[0][0]   │
│ (GlobalAveragePool… │                   │            │                   │
├─────────────────────┼───────────────────┼────────────┼───────────────────┤
│ dense_6 (Dense)     │ (None, 256)       │     16,640 │ global_average_p… │
├─────────────────────┼───────────────────┼────────────┼───────────────────┤
│ dropout (Dropout)   │ (None, 256)       │          0 │ dense_6[0][0]     │
├─────────────────────┼───────────────────┼────────────┼───────────────────┤
│ dense_7 (Dense)     │ (None, 10)        │      2,570 │ dropout[0][0]     │
└─────────────────────┴───────────────────┴────────────┴───────────────────┘
 Total params: 223,242 (872.04 KB)
 Trainable params: 223,242 (872.04 KB)
 Non-trainable params: 0 (0.00 B)
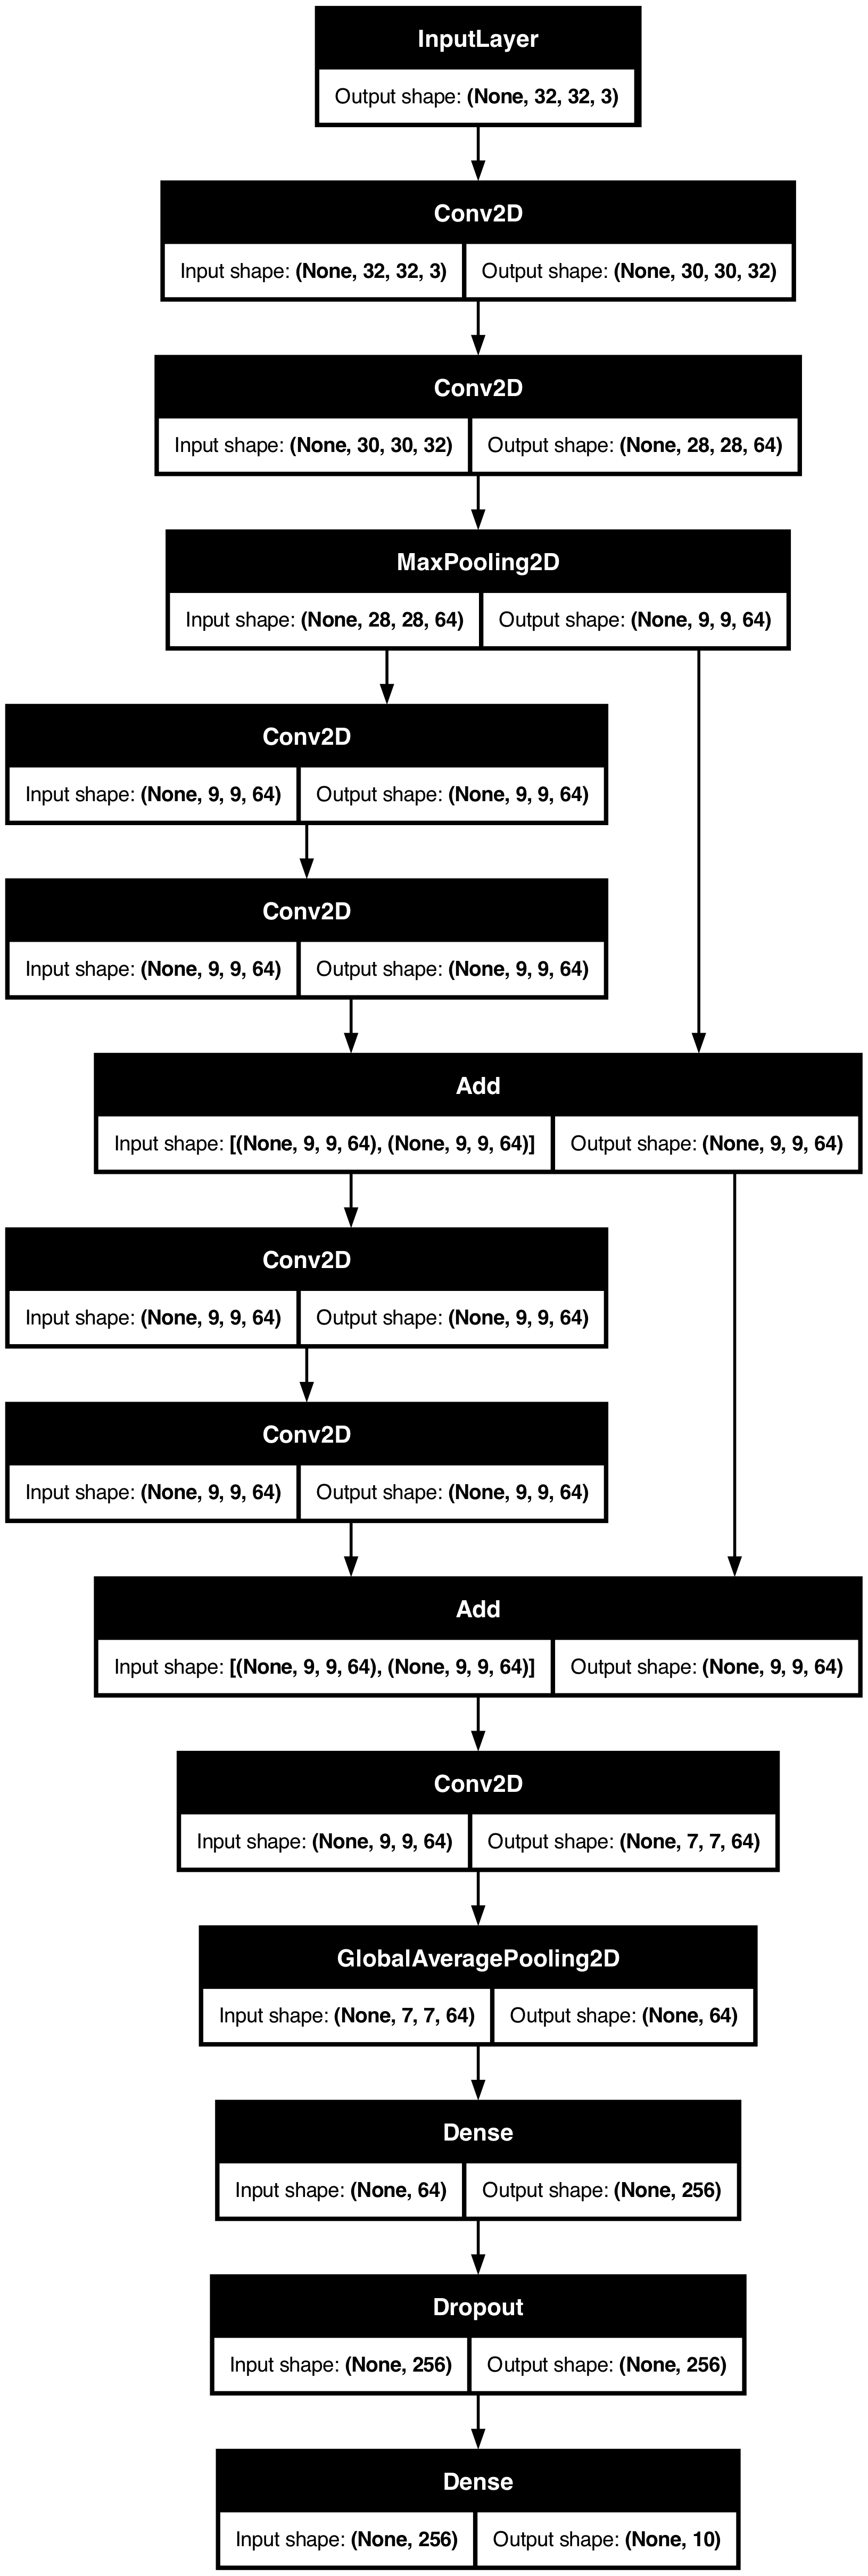
모델을 플롯합니다:
keras.utils.plot_model(model, "mini_resnet.png", show_shapes=True)
이제 모델을 트레이닝합니다:
(x_train, y_train), (x_test, y_test) = keras.datasets.cifar10.load_data()

x_train = x_train.astype("float32") / 255.0
x_test = x_test.astype("float32") / 255.0
y_train = keras.utils.to_categorical(y_train, 10)
y_test = keras.utils.to_categorical(y_test, 10)

model.compile(
    optimizer=keras.optimizers.RMSprop(1e-3),
    loss=keras.losses.CategoricalCrossentropy(from_logits=True),
    metrics=["acc"],
)
# Colab에서 실행 시간을 제한하기 위해 데이터를 처음 1000개 샘플로 제한합니다.
# 수렴할 때까지 전체 데이터 세트에 대해 트레이닝해 보세요!
model.fit(
    x_train[:1000],
    y_train[:1000],
    batch_size=64,
    epochs=1,
    validation_split=0.2,
)
결과
 13/13 ━━━━━━━━━━━━━━━━━━━━ 1s 60ms/step - acc: 0.1096 - loss: 2.3053 - val_acc: 0.1150 - val_loss: 2.2973

<keras.src.callbacks.history.History at 0x1758bed40>
공유 레이어
함수형 API의 또 다른 좋은 용도는 공유 레이어(shared layers) 를 사용하는 모델입니다. 공유 레이어는 동일한 모델에서 여러 번 재사용되는 레이어 인스턴스입니다. 레이어 그래프에서 여러 경로에 해당하는 특성을 학습합니다.
공유 레이어는 종종 유사한 공간의 입력을 인코딩하는 데 사용됩니다. (예: 유사한 어휘를 특성으로 하는 두 개의 서로 다른 텍스트) 이러한 서로 다른 입력에서 정보를 공유할 수 있게 하며, 이러한 모델을 더 적은 데이터로 트레이닝할 수 있게 합니다. 주어진 단어가 입력 중 하나에서 발견되면, 공유 레이어를 통과하는 모든 입력을 처리하는데 도움이 됩니다.
함수형 API에서 레이어를 공유하려면,
동일한 레이어 인스턴스를 여러 번 호출합니다.
예를 들어, 두 개의 서로 다른 텍스트 입력에서 공유되는 Embedding 레이어는 다음과 같습니다.
# 128차원 벡터에 매핑된 1000개의 고유한 단어 임베딩
shared_embedding = layers.Embedding(1000, 128)

# 가변 길이 정수 시퀀스
text_input_a = keras.Input(shape=(None,), dtype="int32")

# 가변 길이 정수 시퀀스
text_input_b = keras.Input(shape=(None,), dtype="int32")

# 동일한 레이어를 재사용하여, 두 입력을 모두 인코딩합니다.
encoded_input_a = shared_embedding(text_input_a)
encoded_input_b = shared_embedding(text_input_b)
그래프의 레이어에서 노드 추출 및 재사용
조작하는 레이어의 그래프는 정적 데이터 구조이므로, 액세스하고 검사할 수 있습니다. 그리고 이렇게 해서 함수형 모델을 이미지로 플로팅할 수 있습니다.
이는 또한 중간 레이어(그래프의 “노드”)의 활성화에 액세스하여, 다른 곳에서 재사용할 수 있다는 것을 의미합니다. 이는 특성 추출과 같은 작업에 매우 유용합니다.
예를 들어 보겠습니다. 이는 ImageNet에 대해 사전 트레이닝된 가중치가 있는 VGG19 모델입니다.
vgg19 = keras.applications.VGG19()그리고 이는, 그래프 데이터 구조를 쿼리하여 얻은, 모델의 중간 활성화입니다.
features_list = [layer.output for layer in vgg19.layers]이러한 특성들을 사용하여, 중간 레이어 활성화 값을 반환하는, 새로운 특성 추출 모델을 만듭니다.
feat_extraction_model = keras.Model(inputs=vgg19.input, outputs=features_list)

img = np.random.random((1, 224, 224, 3)).astype("float32")
extracted_features = feat_extraction_model(img)
이 기능은 신경 스타일 전송 등의 작업에 유용합니다.
커스텀 레이어를 사용하여 API 확장
keras에는 다음과 같은 다양한 빌트인 레이어가 포함되어 있습니다.
- 컨볼루션 레이어:
Conv1D,Conv2D,Conv3D,Conv2DTranspose - 풀링 레이어:
MaxPooling1D,MaxPooling2D,MaxPooling3D,AveragePooling1D - RNN 레이어:
GRU,LSTM,ConvLSTM2D BatchNormalization,Dropout,Embedding등
하지만, 필요한 것을 찾지 못하면, 자체 레이어를 만들어 API를 쉽게 확장할 수 있습니다.
모든 레이어는 Layer 클래스를 서브클래싱하고, 다음을 구현합니다.
call메서드- 레이어에서 수행되는 계산을 지정
build메서드- 레이어의 가중치를 생성(
__init__에서도 가중치를 생성할 수 있으므로, 이는 스타일 규칙일 뿐입니다)
- 레이어의 가중치를 생성(
레이어를 처음부터 만드는 방법에 대해 자세히 알아보려면, 서브클래싱을 통해 새로운 레이어와 모델 만들기 가이드를 읽어보세요.
다음은 keras.layers.Dense의 기본 구현입니다.
class CustomDense(layers.Layer):
    def __init__(self, units=32):
        super().__init__()
        self.units = units

    def build(self, input_shape):
        self.w = self.add_weight(
            shape=(input_shape[-1], self.units),
            initializer="random_normal",
            trainable=True,
        )
        self.b = self.add_weight(
            shape=(self.units,), initializer="random_normal", trainable=True
        )

    def call(self, inputs):
        return ops.matmul(inputs, self.w) + self.b


inputs = keras.Input((4,))
outputs = CustomDense(10)(inputs)

model = keras.Model(inputs, outputs)
커스텀 레이어에서 직렬화를 지원하려면,
레이어 인스턴스의 생성자 인수를 반환하는 get_config() 메서드를 정의합니다.
class CustomDense(layers.Layer):
    def __init__(self, units=32):
        super().__init__()
        self.units = units

    def build(self, input_shape):
        self.w = self.add_weight(
            shape=(input_shape[-1], self.units),
            initializer="random_normal",
            trainable=True,
        )
        self.b = self.add_weight(
            shape=(self.units,), initializer="random_normal", trainable=True
        )

    def call(self, inputs):
        return ops.matmul(inputs, self.w) + self.b

    def get_config(self):
        return {"units": self.units}


inputs = keras.Input((4,))
outputs = CustomDense(10)(inputs)

model = keras.Model(inputs, outputs)
config = model.get_config()

new_model = keras.Model.from_config(config, custom_objects={"CustomDense": CustomDense})
선택적으로, config 딕셔너리를 사용하여 레이어 인스턴스를 재생성할 때 사용되는,
클래스 메서드 from_config(cls, config)를 구현합니다.
from_config의 기본 구현은 다음과 같습니다.
def from_config(cls, config):
  return cls(**config)
함수형 API를 사용해야 하는 경우
Keras 함수형 API를 사용하여 새 모델을 만들어야 할까요,
아니면 Model 클래스를 직접 서브클래싱해야 할까요?
일반적으로 함수형 API는 더 높은 레벨이고, 더 쉽고, 더 안전하며,
서브클래싱된 모델에서 지원하지 않는 여러 기능이 있습니다.
그러나, 모델 서브클래싱은 레이어의 방향성있는 비순환 그래프로
쉽게 표현할 수 없는 모델을 빌드할 때 더 큰 유연성을 제공합니다.
예를 들어, 함수형 API로 Tree-RNN을 구현할 수 없고,
Model 클래스를 직접 서브클래싱해야 합니다.
함수형 API와 모델 서브클래싱의 차이점을 자세히 알아보려면, TensorFlow 2.0의 심볼릭 및 명령형 API는 무엇인가?를 읽어보세요.
함수형 API 강점:
다음 속성은 Sequential 모델(데이터 구조이기도 함)에도 해당하지만, 서브클래스 모델(데이터 구조가 아닌, Python 바이트코드)에는 해당되지 않습니다.
덜 장황합니다
super().__init__(...)도 없고, def call(self, ...): 등도 없습니다.
함수형 버전:
inputs = keras.Input(shape=(32,))
x = layers.Dense(64, activation='relu')(inputs)
outputs = layers.Dense(10)(x)
mlp = keras.Model(inputs, outputs)
서브클래싱된 버전:
class MLP(keras.Model):

  def __init__(self, **kwargs):
    super().__init__(**kwargs)
    self.dense_1 = layers.Dense(64, activation='relu')
    self.dense_2 = layers.Dense(10)

  def call(self, inputs):
    x = self.dense_1(inputs)
    return self.dense_2(x)

# 모델을 인스턴스화합니다.
mlp = MLP()
# 모델의 상태를 만드는 데 필요합니다.
# 모델은 적어도 한 번 호출될 때까지 상태가 없습니다.
_ = mlp(ops.zeros((1, 32)))
연결성 그래프를 정의하는 동안 모델 검증
함수형 API에서, 입력 사양(shape 및 dtype)은 미리 생성됩니다. (Input 사용)
레이어를 호출할 때마다, 레이어는 전달된 사양이 가정과 일치하는지 확인하고,
일치하지 않으면 유용한 오류 메시지를 표시합니다.
이렇게 하면 함수형 API로 빌드할 수 있는 모든 모델이 실행됩니다. 컨버전스 관련(convergence-related) 디버깅을 제외한 모든 디버깅은, 실행 시간이 아닌 모델 생성 중에 정적으로 발생합니다. 이는 컴파일러의 타입 검사와 유사합니다.
함수형 모델은 플롯이 가능하고 검사가 가능합니다.
모델을 그래프로 플롯할 수 있으며, 이 그래프에서 중간 노드에 쉽게 접근할 수 있습니다. 예를 들어, 중간 레이어의 활성화를 추출하여 재사용할 수 있습니다. (이전 예에서 본 것처럼):
features_list = [layer.output for layer in vgg19.layers]
feat_extraction_model = keras.Model(inputs=vgg19.input, outputs=features_list)
함수형 모델은 직렬화되거나 복제될 수 있습니다.
함수형 모델은 코드 조각이 아니라 데이터 구조이기 때문에 안전하게 직렬화할 수 있으며, 원본 코드에 액세스하지 않고도 정확히 동일한 모델을 다시 만들 수 있는 단일 파일로 저장할 수 있습니다. 모델 저장, 직렬화 및 export를 참조하세요.
서브클래스된 모델을 직렬화하려면,
구현자가 모델 레벨에서 get_config() 및 from_config() 메서드를 지정해야 합니다.
함수형 API 약점:
동적 아키텍처를 지원하지 않습니다.
함수형 API는 모델을 레이어의 DAG로 취급합니다. 이는 대부분의 딥러닝 아키텍처에 해당하지만, 모든 아키텍처에 해당하는 것은 아닙니다. 예를 들어, 재귀적 네트워크나 Tree RNN은 이 가정을 따르지 않으며, 함수형 API에서 구현할 수 없습니다.
API 스타일 혼합 및 매치
함수형 API 또는 모델 서브클래싱 중에서 선택하는 것은,
한 가지 모델 카테고리로 제한하는 이진 결정이 아닙니다.
keras API의 모든 모델은 (Sequential 모델, 함수형 모델 또는 처음부터 작성된 서브클래싱 모델이든)
서로 상호 작용할 수 있습니다.
항상 함수형 모델 또는 Sequential 모델을 서브클래싱 모델 또는 레이어의 일부로 사용할 수 있습니다.
units = 32
timesteps = 10
input_dim = 5

# 함수형 모델 정의
inputs = keras.Input((None, units))
x = layers.GlobalAveragePooling1D()(inputs)
outputs = layers.Dense(1)(x)
model = keras.Model(inputs, outputs)


class CustomRNN(layers.Layer):
    def __init__(self):
        super().__init__()
        self.units = units
        self.projection_1 = layers.Dense(units=units, activation="tanh")
        self.projection_2 = layers.Dense(units=units, activation="tanh")
        # 이전에 정의된 함수형 모델
        self.classifier = model

    def call(self, inputs):
        outputs = []
        state = ops.zeros(shape=(inputs.shape[0], self.units))
        for t in range(inputs.shape[1]):
            x = inputs[:, t, :]
            h = self.projection_1(x)
            y = h + self.projection_2(state)
            state = y
            outputs.append(y)
        features = ops.stack(outputs, axis=1)
        print(features.shape)
        return self.classifier(features)


rnn_model = CustomRNN()
_ = rnn_model(ops.zeros((1, timesteps, input_dim)))
결과
(1, 10, 32)
(1, 10, 32)
다음 패턴 중 하나를 따르는 call 메서드를 구현하는 한,
함수형 API에서 모든 서브 클래스된 레이어 또는 모델을 사용할 수 있습니다.
call(self, inputs, **kwargs)inputs는 텐서 또는 텐서의 중첩 구조(예: 텐서 리스트)**kwargs는 텐서가 아닌 인수(입력이 아님)
call(self, inputs, training=None, **kwargs)training은 레이어가 트레이닝 모드와 추론 모드에서 동작해야 하는지 여부를 나타내는 boolean
call(self, inputs, mask=None, **kwargs)mask는 boolean 마스크 텐서(예를 들어, RNN에 유용함)
call(self, inputs, training=None, mask=None, **kwargs)- 물론, 마스킹과 트레이닝 특정 동작을 동시에 가질 수 있습니다.
또한, 커스텀 레이어나 모델에 get_config 메서드를 구현하는 경우,
만든 함수형 모델은 여전히 직렬화 및 복제가 가능합니다.
다음은 처음부터 작성된 커스텀 RNN을 함수형 모델에 사용하는 간단한 예입니다.
units = 32
timesteps = 10
input_dim = 5
batch_size = 16


class CustomRNN(layers.Layer):
    def __init__(self):
        super().__init__()
        self.units = units
        self.projection_1 = layers.Dense(units=units, activation="tanh")
        self.projection_2 = layers.Dense(units=units, activation="tanh")
        self.classifier = layers.Dense(1)

    def call(self, inputs):
        outputs = []
        state = ops.zeros(shape=(inputs.shape[0], self.units))
        for t in range(inputs.shape[1]):
            x = inputs[:, t, :]
            h = self.projection_1(x)
            y = h + self.projection_2(state)
            state = y
            outputs.append(y)
        features = ops.stack(outputs, axis=1)
        return self.classifier(features)


# `CustomRNN`의 내부 계산에는 정적 배치 크기가 필요하므로(`state` 제로 텐서를 생성할 때),
# `batch_shape` 인수를 사용하여 입력에 대한 정적 배치 크기를 지정해야 합니다.
inputs = keras.Input(batch_shape=(batch_size, timesteps, input_dim))
x = layers.Conv1D(32, 3)(inputs)
outputs = CustomRNN()(x)

model = keras.Model(inputs, outputs)

rnn_model = CustomRNN()
_ = rnn_model(ops.zeros((1, 10, 5)))